Installing iOS beta can be an exciting opportunity for iPhone and iPad users to get a glimpse of new features and improvements before they are officially released. In this guide, we will walk you through the process of installing IPSW beta files on your iOS device.
Please note that beta versions may contain bugs and stability issues, so it’s recommended to install them on non-primary devices or backup your data beforehand.
Will I lose my data when updating using this method?
No, if you follow each step in this tutorial, you will not lose any data, especially be careful at step 6.
Step 1: Prepare Your Device
Before you start the installation process, make sure you have a compatible iPhone or iPad model and have backed up your data using iCloud or iTunes. Additionally, ensure that your device has enough battery life or is connected to a power source during the installation process.
Step 2: Download the IPSW Beta File
To install the beta version, you need download the corresponding beta IPSW file from Apple’s Developer website or anywhere else on the internet.
We suggest using ipsw.dev to download .ipsw files for your device. This website continuously updates the latest beta IPSW files directly from Apple’s servers.
Step 3: Connect Your Device to a Computer
Connect your iPhone or iPad to a Mac or PC using a Lightning/USB-C cable.
Make sure you have downloaded the latest version of iTunes if you’re using Windows. If you’re using a Mac, you will need to install either Xcode beta or MobileDevice.pkg, which can be extracted from Xcode beta (two-finger tap or right-click on Xcode beta in the Applications folder, then select Show Package Content > Contents > Resources > Packages > MobileDevice.pkg - this will work on older Macs that do not support the latest macOS or Xcode beta).
Xcode beta can be downloaded from the Apple Developer website using your free Apple ID account.
Step 4: Launch iTunes or Finder
Once your device is connected, launch iTunes (Windows) or Finder (Mac) to prepare for the installation process.
Step 5: Put Your Device in Recovery Mode
To proceed, you will need to put your device in recovery mode. The steps to enter recovery mode differ depending on the model of your device. Here’s how it’s done:
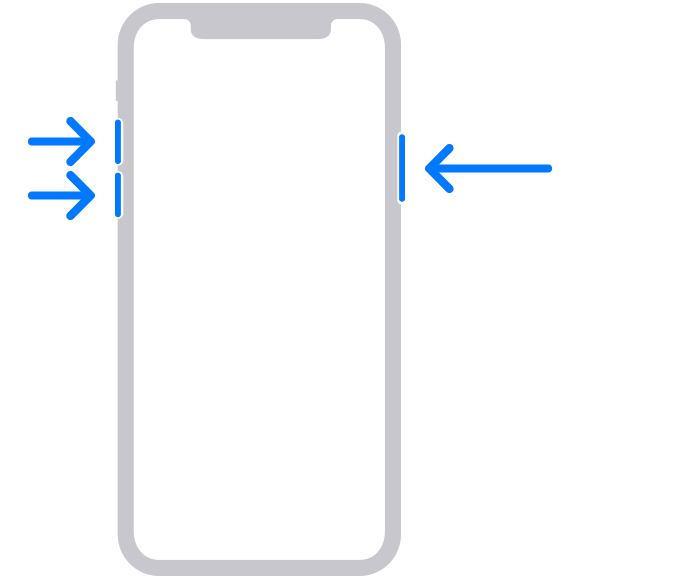
For iPhone 8 and later models:
- Press and release the volume up button.
- Press and release the volume down button.
- Press and hold the side button until you see the recovery mode screen.
For iPhone 7 and 7 Plus:
- Press and hold the volume down button and the side button simultaneously.
- Keep holding both buttons until you see the recovery mode screen.

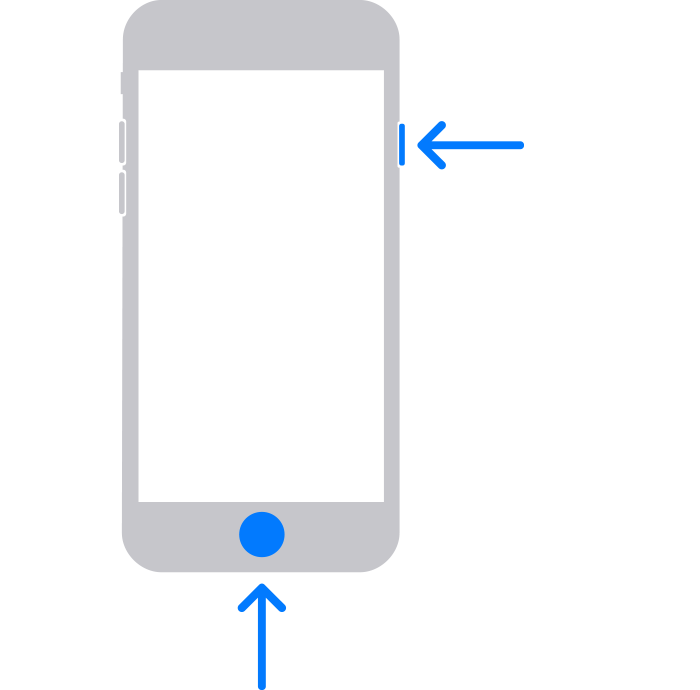
For iPad or iPhone 6s and earlier models:
- Press and hold the home button and the side (or top) button simultaneously.
- Continue holding both buttons until you see the recovery mode screen.
Step 6: Update Your Device
iTunes or Finder should now display a message indicating that it has detected your device in recovery mode. Click on the “Update” button while holding down the “Option” key (Mac) or the “Shift” key (Windows). This will allow you to select the IPSW beta file you downloaded earlier.

Step 7: Choose the IPSW Beta File
A file selection dialog box will appear. Navigate to the location where you saved the IPSW beta file, select it, and click “Open.”
Step 8: Begin the Installation Process
iTunes or Finder will now begin the installation process. The IPSW beta file will be extracted, and the software update will be applied to your device. Do not disconnect your device during this process, as it may result in an incomplete installation.
Note: You must have an active internet connection as it will check the IPSW signing status before it will proceed with the update.
Step 9: Complete the Setup Process
After the installation is complete, your device will restart and display the “Hello” screen. Follow the on-screen instructions to set up your device. You may be prompted to sign in with your Apple ID and restore your data from a backup if desired.
 Notes/Tips
- It may be better to close all apps before installing the updates and/or turn off your device for about a minute or restart a few minutes after your device is updated
- You do not need to install the MobileDevice.pkg from each Xcode beta version unless Finder does not recognize the new iOS beta
- There is no MobileDevice.pkg equivalent to iTunes for PC which would require a new iTunes to support new/beta iOS
- If you receive a new iPhone, you can connect to Mac to update or restore your device to the latest iOS before setting up your device.
Installing IPSW beta files on your iPhone or iPad allows you to explore upcoming features and enhancements. Remember to exercise caution and backup your data before proceeding with any beta installations. By following this step-by-step guide, you’ll be able to confidently install IPSW beta files and experience the latest iOS features before they become widely available to the public.